
Today we’re going to discuss using stunnel to bypass some deep packet inspection tools, which is very useful when performing thorough penetration tests. This setup is great for when you are trying to avoid detection or when security software put in place by a client is restricting you, and it’s important for your customer to know when these methods are possible.
Stunnel works well to:
- Bypass Deep Packet Inspection (DPI)
- Bypass Network IPS
- Bypass SOC Detection
- Disguise Network Traffic
- Exfiltrate data when you have limited egress ports enabled
We’ll discuss how to set things up and what happens to the traffic once you’ve got it working.
Getting Started with Stunnel
For this blog, we will be using stunnel to wrap SSH traffic in a TLS/SSL wrapper. Stunnel is a proxy designed to add TLS/SSL encryption functionality to existing clients and servers. It wraps and unwraps data using the OpenSSL library and is highly customizable.
It’s important to note that TLS/SSL traffic can be decrypted with SSL Decryption built into a firewall or Man-In-The-Middle (MiTM) device, but it requires the client device to fully trust that MiTM device’s root CA.
As always, we recommend SSH key-based authentication for security reasons, and we will assume that configuration for the lab.
We are going to assume the following constants:
- The cloud server is a Linux box with SSH and stunnel installed; it is named LocalHost.
- The client machine that we hacked into is a Linux box with SSH and stunnel installed. In this guide; it is named ProxKali.
- You already have an SSH Key pair to connect to the cloud server.
Setting Up the Cloud Server – LocalHost
First, we need to generate a basic SSL certificate to use for the SSL wrapper:
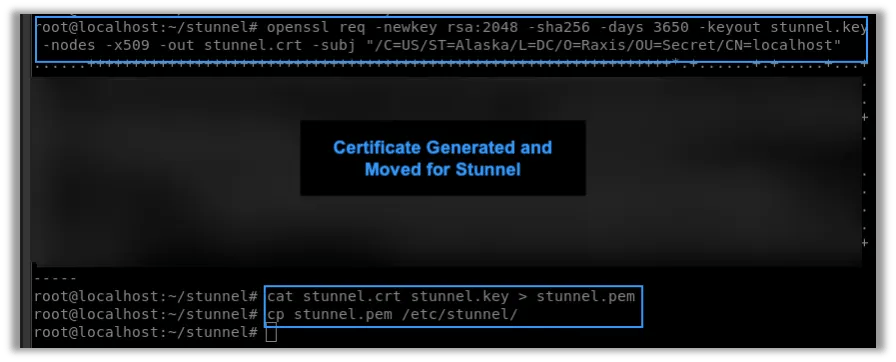
Let’s breakdown the steps in this screenshot. Our command is:
openssl req -newkey rsa:2048 -sha256 -days 3650 -keyout stunnel.key -nodes -x509 -out stunnel.crt -subj “/C=US/ST=Alaska/L=DC/O=Raxis/OU=Secret/CN=Localhost” And it breaks down to the following:
- openssl req – You are using the certificate request utility in OpenSSL.
- -newkey rsa:2048 – Generate a brand-new 2048-bit RSA private key as part of this operation, rather than reusing an existing one.
- -sha256 – Sign the certificate using SHA-256. Modern OpenSSL defaults to this anyway, but we are just ensuring we don’t default to SHA-1.
- -days 3650 – We are setting the certificate to be valid for 3650 days.
- -keyout stunnel.key – We are writing the key to the file stunnel.key.
- -nodes – Shorthand for No DES, so we are saying “Don’t encrypt the key.”
- -x509 – Outputs a self-signed certificate.
- -out stunnel.crt – Write the certificate to the file stunnel.crt.
- -subj “/C…” – This is optional; we are just answering the questions asked when generating a new SSL certificate ahead of time.
Right after that, we combine the certificate and key files into one .pem file. We then copy that new stunnel.pem into the same location as our configuration file:
cat stunnel.crt stunnel.key > stunnel.pem
cp stunnel.pem /etc/stunnel/
Next, we configure the stunnel service parameters in /etc/stunnel/stunnel.conf:
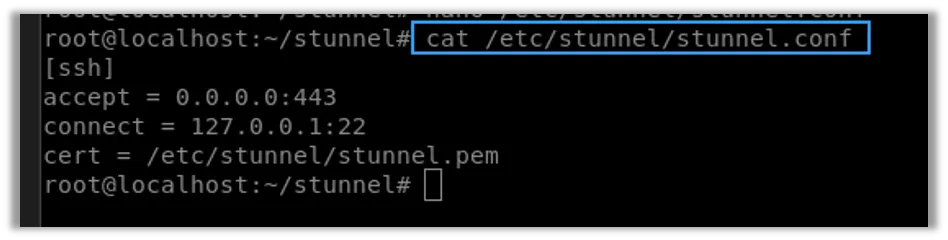
We set the following parameters:
- [ssh] – Set the name of our stunnel instance to ssh.
- accept = 0.0.0.0:443 – We are accepting from any interface on port 443.
- connect = 127.0.0.1:22 – Redirect the successful connections to local port 22.
- cert = /etc/stunnel/stunnel.pem – Directing the service to use the newly created stunnel.pem file.
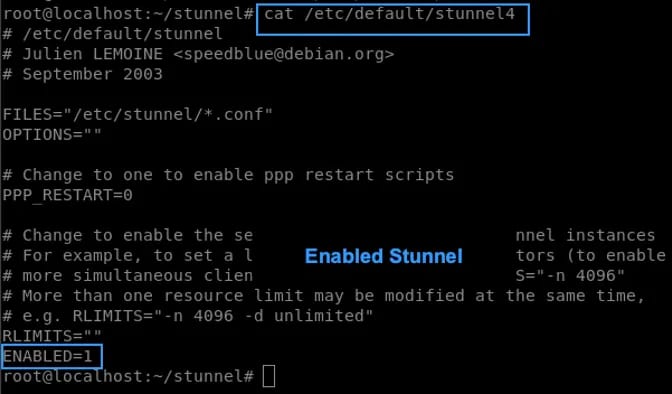
Once we do that, we will then enable our stunnel service using the setting in /etc/default/stunnel4.
ENABLED=1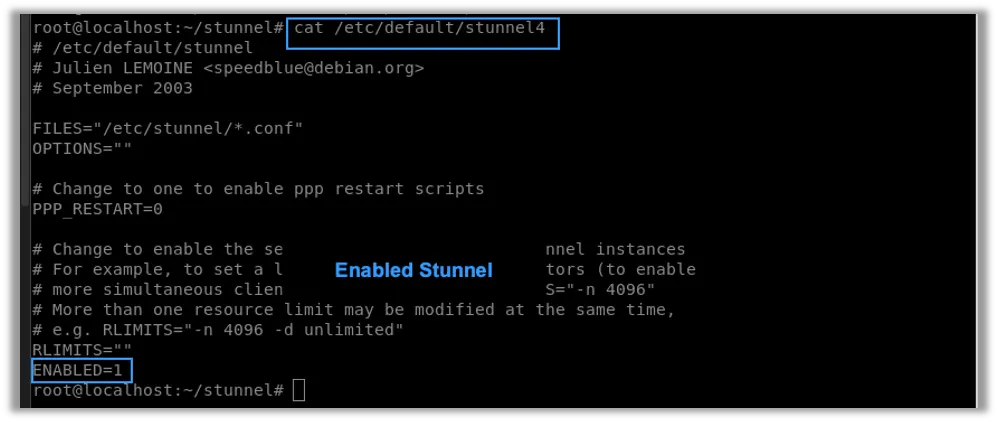
Setting Up the Client Machine – ProxKali
Now we can move over to our client for the next set of configurations. We are configuring the client to automatically connect and set up a local port direct, so that, if we connect to localhost port 2200, we will be directed to the cloud server:
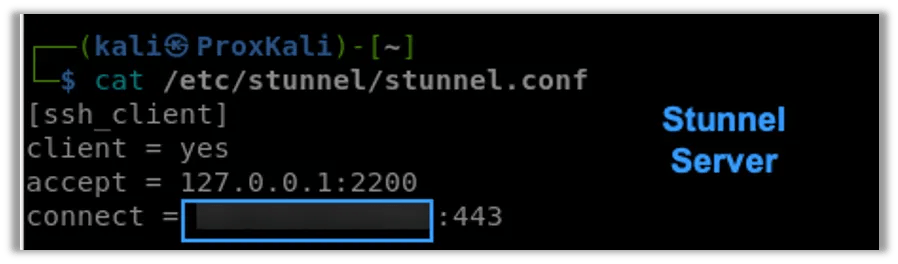
We do that by setting the following configurations inside of /etc/stunnel/stunnel.conf on the client device:
- [ssh_client] – This is now the name of the stunnel instance on the client device.
- client = yes – Set this instance of stunnel to be used as a client.
- accept = 127.0.0.1:2200 – Tell the stunnel instance to setup a listening port on localhost port 2200.
- connect = IP_ADDRESS:443 – Tell the stunnel configuration to direct that connection to the cloud server on port 443 once a connection is received on localhost 2200.
With that now configured, we can now connect through our new HTTPS tunnel with SSH:
ssh root@localhost -p 2200 -I .ssh/lin_server001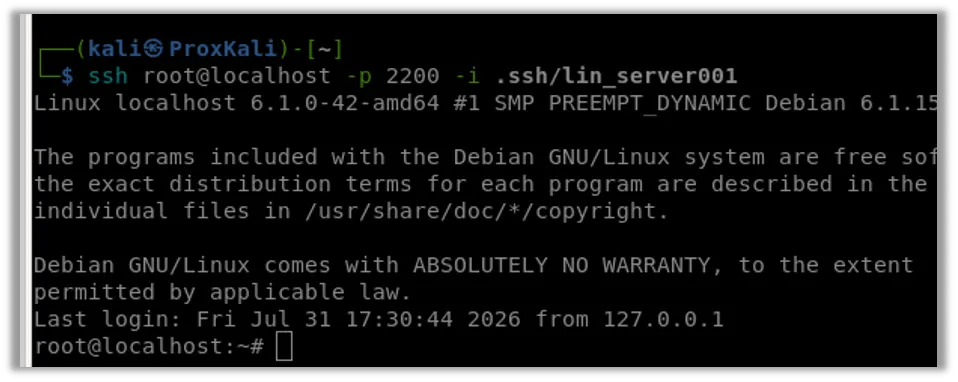
NOTE: As you can imagine it’s very important that you are connecting to the localhost on that setup port, otherwise, you will be connecting directly to the host with SSH instead of wrapping your SSH connection inside of HTTPS.
Testing Out the Tunnel
Now that we have that configured. Let’s verify our traffic by sniffing the network connection we are sending from. Below, we are using a standard SSH connection outside of the HTTPS stunnel. You can clearly see that our traffic is identified as SSH:
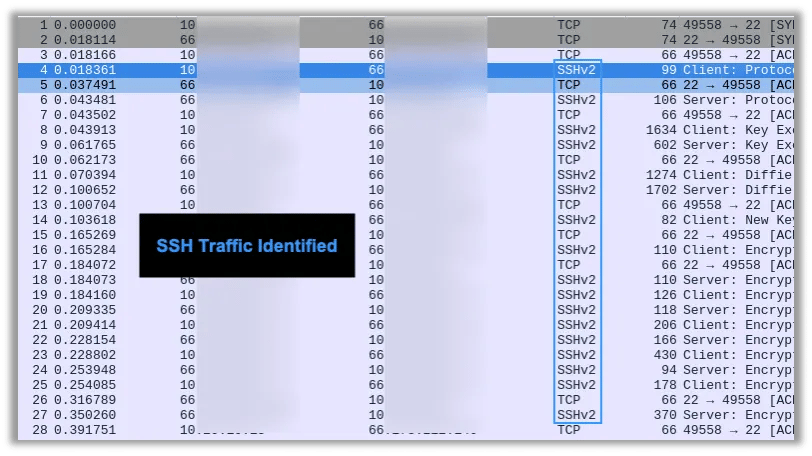
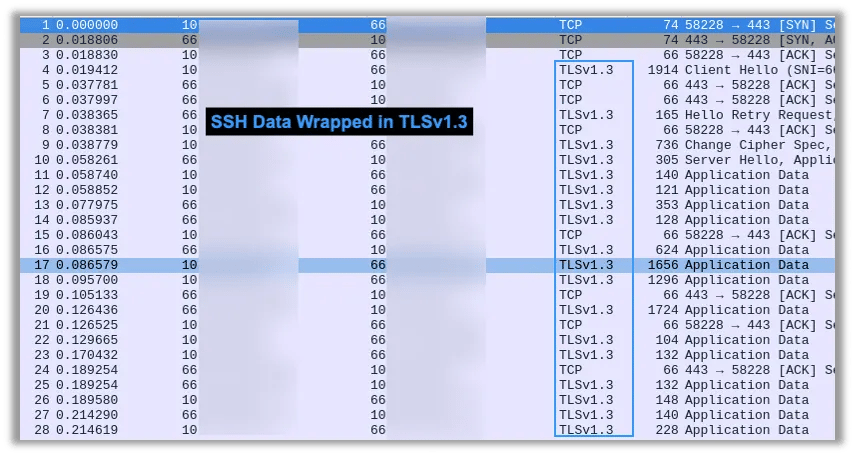
However, when we redirect our traffic through the HTTPS tunnel, our traffic now looks like HTTPS traffic:
Adding Pre-Shared Key (PSK) Authentication
We have now successfully setup our first HTTPS tunnel. However, we do not have authentication on the server. Which means anyone can connect to it and use it the same way we that we can and also potentially exploit it.
We are going to solve this by setting up pre-shared key (PSK) authentication. This requires us to first generate a PSK with OpenSSL:
openssl rand -hex 32We will then add the username that we want to use before the PSK with a colon as a separator:

For the purposes of this lab, we will place a copy of this PSK in the following locations:
- Server – /etc/stunnel/private/server.psk
- Client – /etc/stunnel/client.psk
Now we will modify the stunnel configuration file on both the client and the server. We will start with the server configuration:
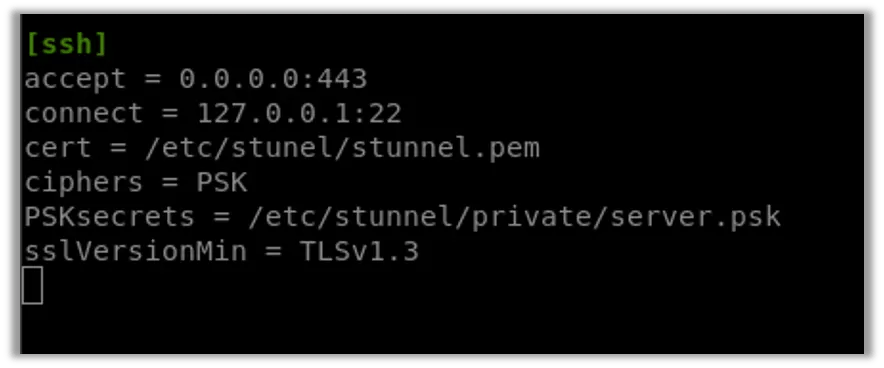
Let’s break down the modifications we are making to our server configuration file:
- ciphers = PSK – State that we will use PSK authentication.
- PSKsecrets = /etc/stunnel/private/server.psk – Tell the stunnel service where to find the PSK file.
- sslVersionMin = TLSv1.3 – State that we will use TLSv1.3 at a minimum for our HTTPS wrapper.
Save the modified file, and you are all set on the server.
Next, we will move onto the client:
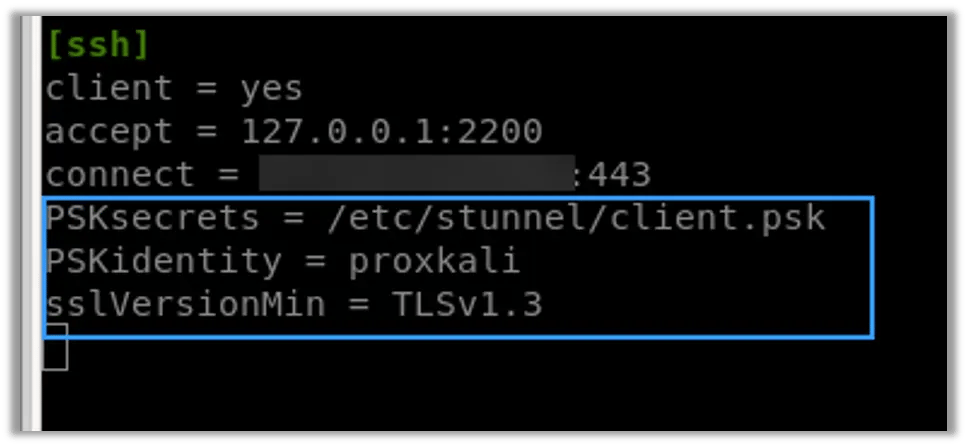
We will break down the modifications we made to our client configuration file:
- PSKsecrets = /etc/stunnel/client.psk – Tell the stunnel service where to find the PSK file.
- PSKidentity = proxkali – Tell the instance what username to use. This needs to match the username you set in the PSK file.
- sslVersionMin = TLSv1.3 – State that we will use TLSv1.3 at a minimum for our HTTPS wrapper.
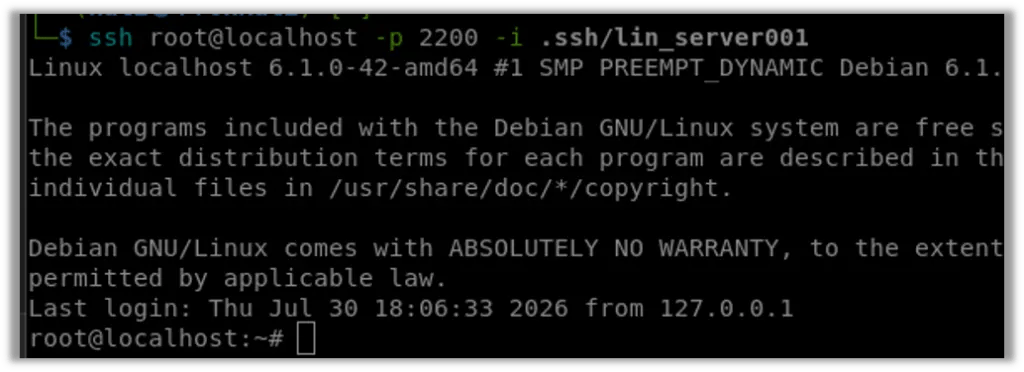
Save the configuration file and re-initiate the client connection, verifying that it is successful:
Confirming the PSK Authentication
We can confirm our instance requires authentication by either changing the username/PSK or by removing it altogether.
Below we set the usernames to Random:
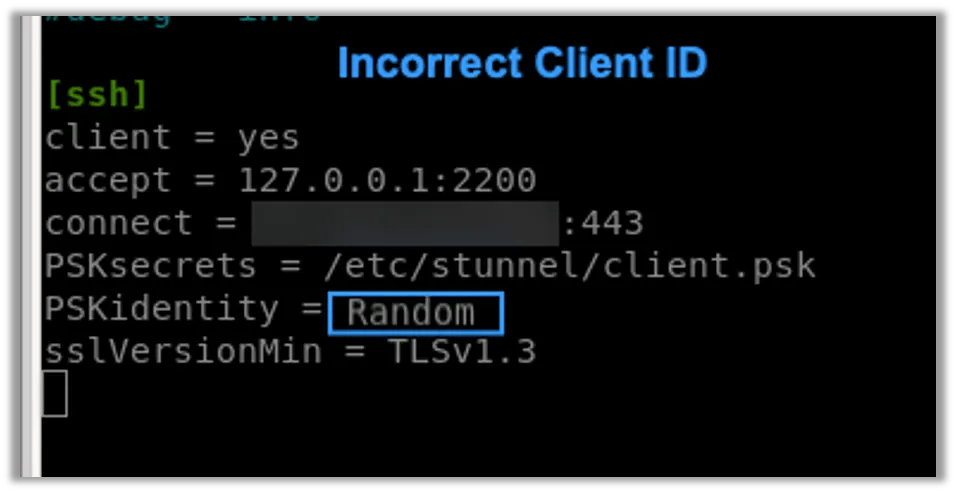
If we then re-initiate our SSH connection through stunnel and check our stunnel server, we get a clear statement that the authentication attempted failed:

Now that we have confirmed that our PSK authentication is working, we are set to reconnect with the correct username and to use our stunnel to bypass DPI during our penetration test.
Next Steps
You can explore more information regarding stunnel at https://www.stunnel.org/manual.html. If you enjoyed this blog, take a look at other tutorial blogs in our How To Series.